
Forex Supply and Demand Explained
April 1, 2020
What are supply and demand zones in forex?
Supply and demand trading is a trading method where the idea is to find points in the market where the price has made a strong advance or decline and mark these areas as supply and demand zones using rectangles.
The point in which the price has made a strong advance is marked by the trader as a demand zone
A point where the market has made a sharp decline is marked as a supply zone
The main premise of supply and demand trading is when the market makes a sharp move up or down the large institutions i.e banks/hedge funds are not able to get their entire trade placed into the market, therefore they leave pending orders to buy or sell at the zone with the expectation the market will return to the zone and the rest of their trading position will be filled.
b. How to Identify Supply and Demand Zones
Technical supply and demand is an approach based on price action. The general idea is to locate points on the chart where price has made a strong advance or decline. A demand zone is typically formed after a strong rally north. Conversely, a supply zone is effectively created following a noticeable move to the downside. This method, especially in the price action community, is widely popular.
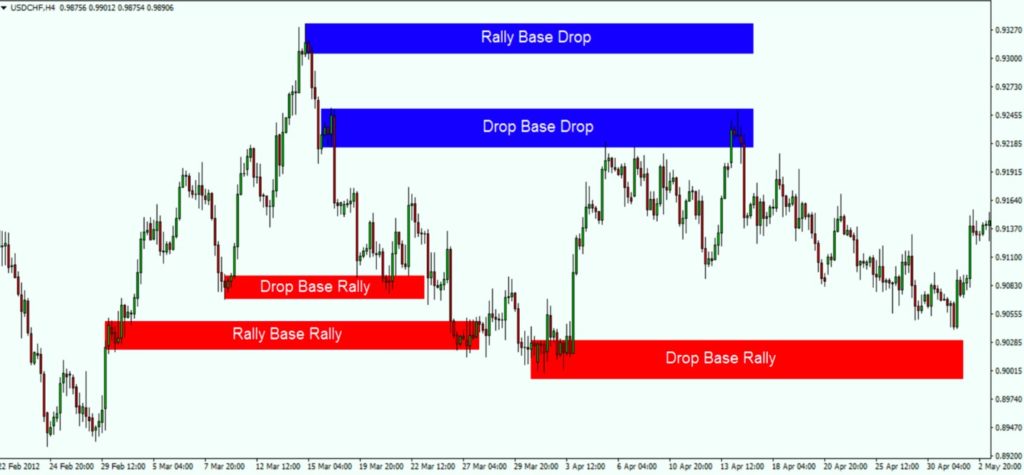
There are four key areas of interest on the charts to look for:
-The Rally Base Rally, or ‘RBR’.
-The Drop Base Drop, or ‘DBD’.
-The Drop Base Rally, or ‘DBR’.
-The Rally Base Drop, or ‘RBD’.
Here’s what some of the above noted zones look like on a live chart. Obviously, not all areas will give winning trades! Learning how to accept a loss is a large part of trading any methodology.
Characteristics of a Strong Zone
Momentum from the zone
One of the fundamental rules to trading supply and demand is “The stronger the move away from a zone the higher the chance the market has of having a strong move away when it eventually returns”
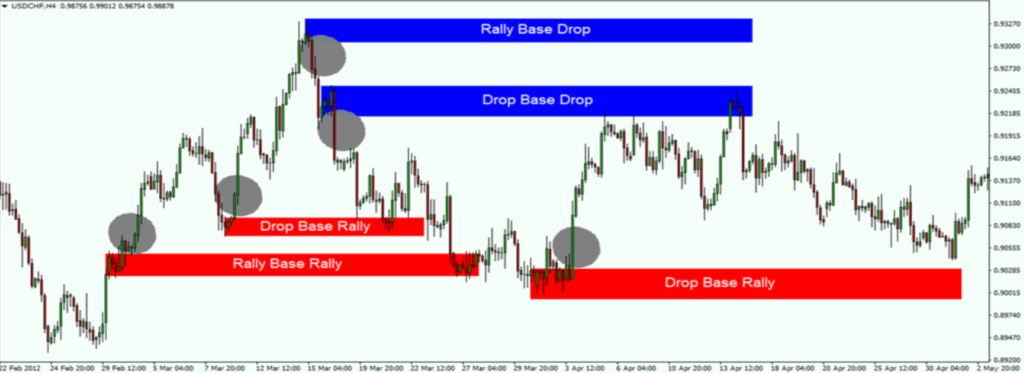
On the chart below, we have marked many areas, each of which are displaying what we would consider to be a strong (gray circles).
Time Spent Away from the Zone
One of the primary rules supply and demand traders use to gauge whether a zone has a high probability of working out successfully is the amount of time the market has spent away from the zone.

If we compare the old supply and demand zones (colored blue), with the more recent zones colored red, it’s easy to see how trading zones which have been created recently is far more profitable than trading zones which were created a long time ago.
Difference Between Supply & Demand and Support & Resistance:
Support and resistance is where one is able to see a number of failed attempts to move beyond a line/area that stretches back in history.
However, in regards to supply and demand, we would essentially be looking for a strong move that has a fresh untouched base, rather than an area which has held firm on a number of tests.
Using supply and demand zones as risk management parameters
Demand and supply zones are very similar to support and resistance and therefore, these areas provide an indication as to where a trader can place stops and limits.
These areas allow traders to implement a positive risk to reward approach on all trades. Range traders that are selling at the supply zone can set stops above the supply zone and targets at the demand zone. Conservative traders can set the target above the demand zone or implement a number of other risk management techniques.
Do Not Expect Miracles
As with anything else, supply and demand zones have their cons, as well. There is no perfect trading strategy or tool. What makes a difference along the way is your attitude towards trading.
A few are the most crucial things beginner traders need to pay more attention to:
1- Proper trading education
2- Trading practice (preferably on a Demo account first)
3- Trading discipline
4- Sticking to your rules in good and bad days
5- Open mind
-Being able to tick those 5 boxes will give you more freedom than you can imagine. As Auberon Herbert has put it:
“You will not make a man wiser by taking freedom of action from him. A man can only learn when he is free to act.”
Here is a Free Supply and Demand Lesson:
In this video, we will discuss:
1- What are Supply and Demand
2- How to Identify valid Supply and Demand Zones
3- Characteristics of a Strong Supply / Demand Zone
4- Difference between Supply & Demand and Support & Resistance
Enjoy it 😁 and see you in the next one!